I joke that I’m high maintenance but dread booking beauty services. I love a long skincare routine, I’m never shy with my collection of hair products, but booking a babysitter to get a manicure?! Not my favorite thing. I’ve shared that on the blog over the years and so my routine goes something like this:
- Do DIY Manicure for a few weeks to months.
- Have a special event, and get a gel manicure.
- Continue gel manicures for a few weeks.
- Get the itch for a dip manicure.
- Get dip for a month and hate how much time/money I’m spending on them.
- Go back to the DIY manicure
The cycle never ends. haha. I was talking to another mom on Instagram DM about two months ago. She has 5 kids and always has perfect manicures. I asked what her routine was. Maybe she booked them early on Saturday mornings while the kids were eating pancakes. Maybe she knew some secret I didn’t. She told me she did gel manicures at home and it was one of her favorite “me time” activities. She’d put her kids down, turn on Netflix, and spend an hour doing her nails. She said it lasted her 2-3 weeks.
I honestly prefer a DIY manicure to a salon manicure, just because I’ve never really had a consistent technician, so I never know what I’m going to get. Sometimes I love the results, and sometimes I don’t. But, I always cave to gel or dip because it lasts so much longer. But 2-3 weeks and doing it at home?! I was intrigued.
I scoured the internet to find the best lamps, top coats, and polishes. I asked you all on Instagram. I watched dozens of Youtube videos. And while I’ve only been doing DIY manicures for about two weeks, I had to cover this on the blog. I can’t believe I hadn’t done this before! I’ve been so happy with the results, that two of my friends actually have come over to my house for me to do it for them because they couldn’t get over how long my nails were lasting.
Before I dive into the “how-to” I want to cover a few things that I think will help you decide if you like this method.
- If you enjoy your time at the nail salon, you may not want to sit at home and do this. Buying all these products is about the cost of 2-3 gel manicures, so if you don’t dread your nail appointment, you may not love doing this. I’ve already made my money back doing this process 4 times {twice on me, and twice on friends}.
- It takes about 45 minutes to do an at-home manicure. Regular polish is easier since you don’t have to cure it and you don’t have to get super thin layers. However, this lasts far longer than a regular manicure does.
For me, if I have a free hour, I’d rather run to lunch with a friend or pop in a coffee shop to get some work done. I always hate spending an hour at a nail salon, so this is a great option. Will I ever get dip or a professional manicure again? Of course!! It’s a fun way to enjoy time with a girlfriend or celebrate an occasion. But I really love that I have these products at home, so for regular manicures, I can save money AND time with Maxi. And with another one on the way, this is probably a far simpler option.
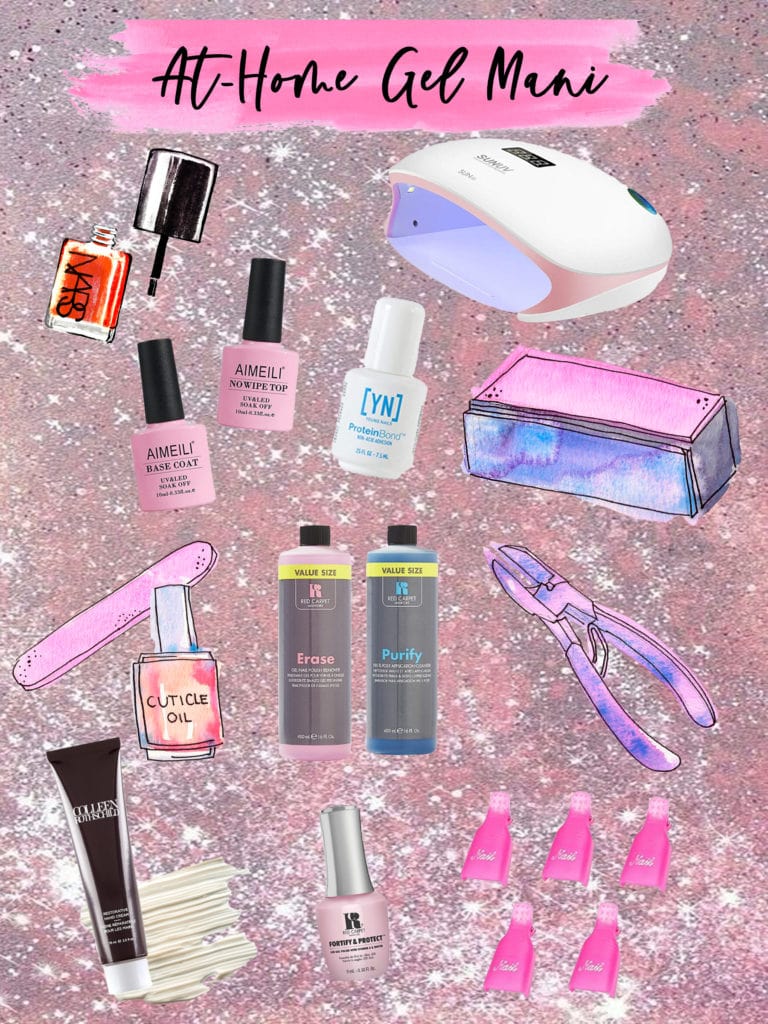
Products
- Gel Nail Polish Remover Kit
- Gel Nail Files
- Nail Buffing Block
- Gel Polish Remover
- Pre & Post Cleanser
- Protein Bond
- Base & Top Coat
- UV Nail Dryer
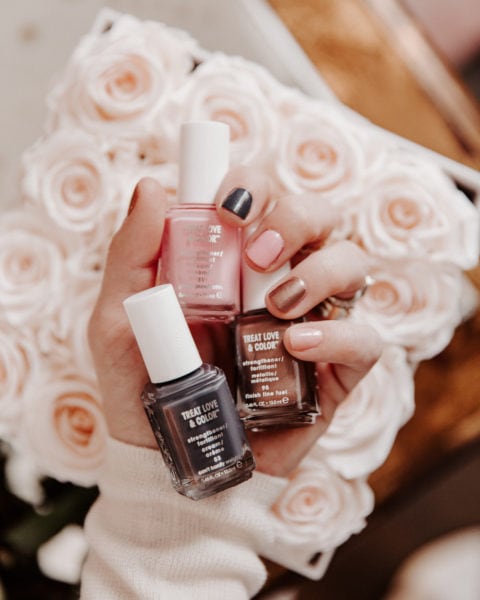
- Polish {Box Office Hit, first manicure color}
- Polish {Second manicure color}
- Glitter Polish
- Lint-Free Wipes
- Hand Cream
You can find all of the items on my Amazon page here.
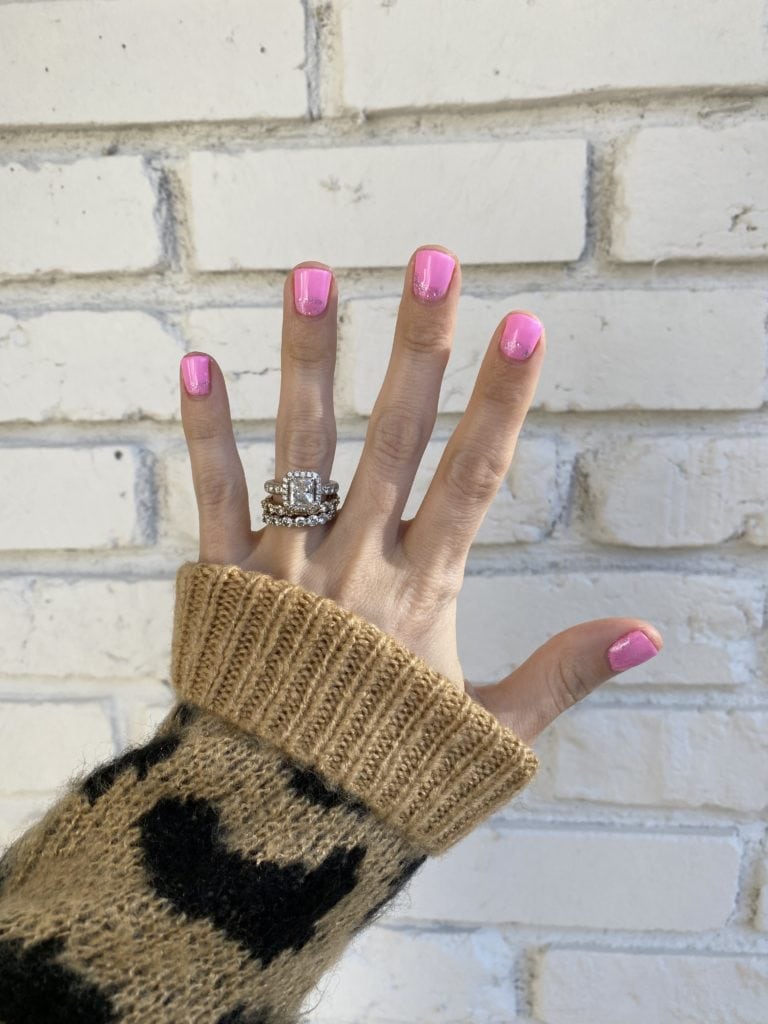
Maxi told me I needed a “Barbie Manicure” for my birthday, so pink and glitter it is! haha. Here are the products I use for the at-home gel manicure.
Application
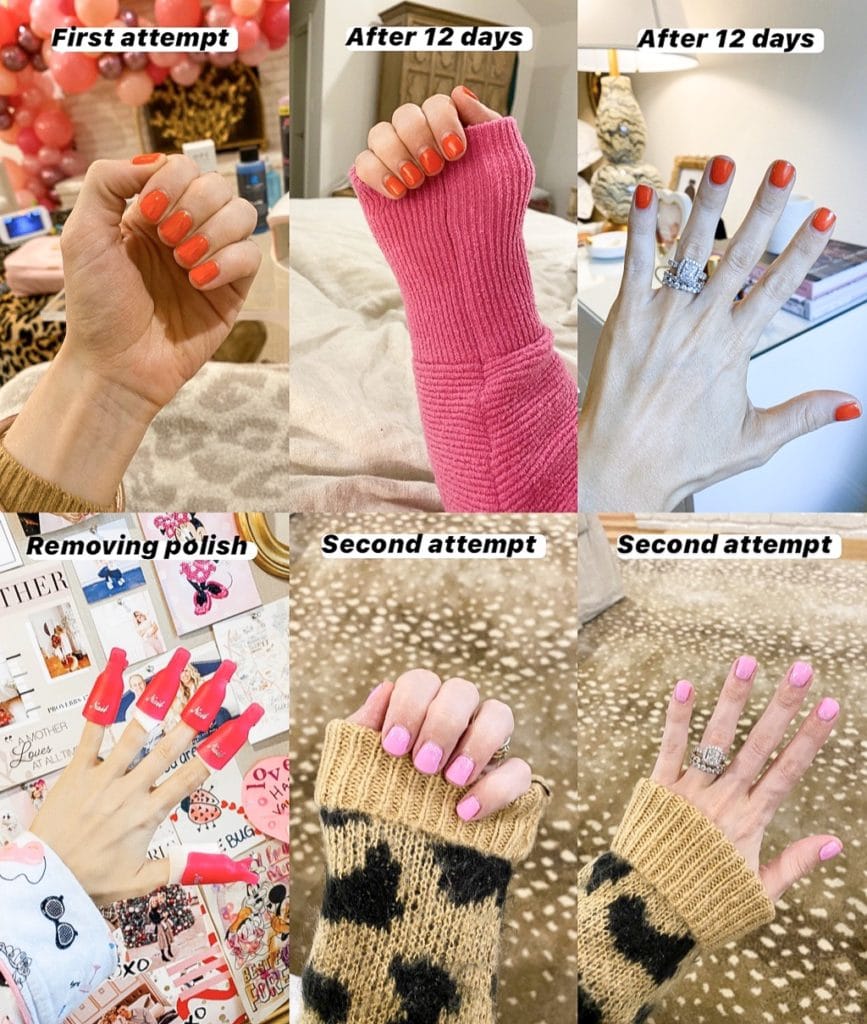
- First, you may need to remove prior gel polish. Using the gel removal kit, buff your nails with an acrylic/gel nail file. You need to buff the entire nail, to remove the top coat of polish. This will help the gel polish break down easier and cause less damage during removal. Then, apply the gel remover to the cotton pads that come in the kit. Place a pad on each nail, and use the plastic clamp to cover your entire nail as shown in my picture. One thing I noticed about this technique, was that I didn’t have to sit with my nails like this for 15 minutes as I may have at a salon. I applied the clamps, and waited about 8 minutes to remove. Then, once you take the clamps off, the polish should already look like it is flaking off. If it isn’t, let them sit for longer. The removal kit comes with a tool to help remove the rest of the polish like they do at the salon. It almost looks like a cuticle pusher {which you could use it for, too!} and gently remove the rest of the polish. Remember, this should come off easily! If not, let them sit longer.
- Next, care for your cuticles. I know some people don’t remove, but I do. I just use a cuticle remover, let sit, push back, and then wash my hands.
- Trim, shape, and buff your nails. I think my favorite part of doing an at-home manicure is always shaping my nails. I have to have short nails or I just end up scratching myself. I keep my nails pretty short and then shape into a square round look. I am envious of all you girls with a beautiful almond shape, but I’m just not made for longer nails. Once you file, you want to take the buffing blocks and buff your entire nail. The buffing is going to help adhere the gel polish to your nail, so do not skip this step.
- Once buffed, apply the pre & post cleanser on your nail. TIP: Use lint-free cotton pads. Gel polish shows you ANY amount of lint, and it isn’t easy to hide like it is with regular polish. I didn’t buy them my first manicure and regretted it.
- After the cleanser, apply a very thin layer of your protein bond to each nail bed.
- Now comes the fun part! First, apply a thin layer of your base coat. You want your gel polish layers to be thin, this helps them not peel up. Don’t get too close to your cuticle, or it can start to snag on your hair, etc. Also “cap” the end of your nail, meaning take the polish to the end of the nail bed and make sure polish gets on the part you file and shape. If you get polish on your skin, immediately remove with the cuticle pusher or some tool. Cure your nails for 30-60 seconds based on the lamp you get. TIP: Yes, you can 100% buy a lamp that comes in a gel kit. However, hundreds of you told me your experience doing DIY gel manicures and the consensus was, that you had to cure your nails longer with those lamps. I do 30 seconds for base coat with my lamp. I wouldn’t recommend the gel nail kits that come with more affordable lamps.
- Then, paint your nails with the gel polish. I wouldn’t do more than 2 coats, and cure in between each layer. I’ll do base coat, 30-second cure, first polish coat, 60-second cure, second polish coat, 60-second cure, top coat, 30-second cure. TIP: When picking polishes, get the smaller gel bottles. The ones I linked are smaller. It’s tempting to buy the large OPI gel polishes on eBay and they do work well. However, gel polish gets goopy faster than regular polish. You’ll use the product you have without having to toss a bottle if you buy smaller. Also, darker colors are easier to paint with than chalkier, light polishes. If you aren’t super confident in your painting skills, I’d start with a deep red or dark polish to get the hang of it.
- Finish with your top coat and cure.
- After you have polished your nails and they have cured, take a lint-free wipe and use the pre & post cleanser. Now the top coat I linked is a wipe-free one, so you don’t have to do this step. I just do it.
- Apply cuticle oil and lotion. I can immediately get back to doing whatever it is I need to do whether that is wash dishes, play with Maxi, or get work done!
While I didn’t leave my polish on for a full 3-weeks {many of you asked me to blog this ASAP!}, at the 2-week mark I saw no signs of it peeling up. I was so pleased at the length this lasted and how easy it was. Of course, when you write all the steps out it seems a little daunting. But, if I can do this in the comfort of my own home, it seems so much easier. Please let me know if you have any questions on this!
P.S. My OB is 100% fine with gel manicures while pregnant!


This is fun! I’m too stingy to go to a salon for a proper manicure so DIY is totally my thing! 🙂
Charmaine Ng | Architecture & Lifestyle Blog
http://charmainenyw.com
I DREAD going to the salon to get a mani/pedi so this is sooo intriguing. Your blog posts are always so thorough. You can truly tell you put your heart and soul in each and every post! HUGE Katey fan right here! 🙂
You are the sweetest girl!! Thank you for this love! xx, Katey
AH I’m so excited for this blog post! I’m a stay-at-home and can’t justify spending extra money on getting manicures and pedicures. Before I had my son I used to do my nails all the time or get them done and it’s something that has fallen to the side. Even though it’s frivolous I always feel more like myself and feel like I put in some effort when I do have my nails done. I pinned this post and am excited to start doing something small/fun for myself! Thanks for always keeping it real and doing budget friendly options even when you have become so successful! You’re such a light!
This is one of my favorite posts you’ve done. I have been in a no spending season since January and the one thing i miss the most is getting my nails professionally done. I will definitely give this a try.
Have you thought about at home dip manicures? I’ve personally never seen them done but didn’t know if you were planning on trying that in the future.
Hi Taylor!
Yay! I’m so thrilled you love the post! I haven’t done at-home dip because I always hear you need the dremel file and that damages my nails so much. But I’d be very into it if I could just use a buffing block. I need to research! xx, Katey
Hi there! First time reading your material. Thank you for your insight and for being so informative. I’ve invested in so many products in the last several months, I could literally open a salon, haha! I recently tried polygels and that didn’t go so well for me. Was doing dip nails prior and loved it. However, I’m interested in extending my short, brittle nails and have become interested in soft gel tip extensions. I can tell you that dip manicures are sooo easy to soak off with acetone! You heat a bowl of rice for about 45-50 seconds. Next, place a fabric softener sheet inside a small ziploc bag filled with an ounce or 2 of acetone. Lastly, stick one of your hands into the bag w the acetone and softener sheet, and place it inside the rice. While your fingers soak in the acetone the heat from the rice will potentiate its effect even more so. The fabric softener sheet acts as a soft abrasive (well, you get the idea). 10-15 minutes, and all of the dip is removed! Best of luck! ?????
I can’t thank you enough for this!! I like dip a lot but always struggle getting it off at home! Thank you, thank you!!!
Bookmarking this!!
I’m starting residency next year and A) I won’t have time for salon appointments B) won’t know my schedule far enough in advance to book appointments C) know I will end up going ages without a mani and my nails growing out will start to look unprofessional
Such a great idea. Thanks
I used the OPI gel top coat and base coat for years. I just bought yours and haven’t had any chips in my nails like I did within the first week of OPI. Thanks so much for the recommendation!
Yay!! This makes me so happy to hear! 🙂 xx, Katey
Just finished my first DIY gel mani thanks to your step-by-step guide and product recommendations! Thank you!! Quick question – did you find that the Gellen colors looked a little different in person than they do online?
Thank you for the care and attention to detail you put into your posts and recommendations. I was nervous about this process (the money, the safety, etc), but knew I could trust it because I trust you!
Hi girl! SOO sorry for my late response on this! Adapting to two over here! 😉 haha. They look a little different online than when painted, but I found the Amazon Review pics at the bottom to be super accurate! xx, Katey
Thanks for the fabulous post. I have followed your steps twice now and am a forever convert. Did you like the gellen or red carpet polish better? Thanks!
Hi Kait! Aw yay! I’m so glad! So I have more gellen polishes just because the kind I have ordered come in a set. I only have on red carpet and I like both really well! I maybe want to say red carpet lasts a day or two longer! xx, Katey
I stumbled across your post via a Google search for an at home gel mani and I purchased all of the items you recommended and did my first mani tonight! It looks incredible. Thank you for your detailed instructions. I’ll be admiring my handiwork 😉 for the rest of the night. And you have a new subscriber!
Yay! This makes me so happy to hear!!! xx, Katey
Such a pleasure to read this… Loving your DIY post. I love beauty and nails and being able to do it myself is exciting yet relaxing at the same time. Thanks for the tips.